Here's a little description of the blog hop and some more info from Yvonne / Quilting Jetgirl:
Cloud9 is generously sponsoring this New Block Blog Hop featuring their Organic Cirrus Solids. The blog hop hosts, Yvonne @Quilting Jetgirl, Cheryl @Meadow Mist Designs, and Stephanie @Late Night Quilter, have curated the “Berry Harvest” bundle, and Cloud9 is supplying each participant with a fat quarter bundle. Blocks made for the hop will be collected and made into quilts for donation.

My block is named "Mazarin" after the lesser known diamond cut. I designed it myself after sketching some ideas on graph paper. Three or four designs in I came up with this block and I totally fell in love with it! The thing i love the most? It's nearly waste-free. Myself and my pattern testers did very very little trimming to these blocks, making the block extremely effective at using up as much of the fabric as necessary with little to no waste!
I am always looking for that perfect block that allows you to use fussy cuts or prints you really want to showcase in the middle. This block does exactly that! I has a generous 6" center thats perfect for those prints you cant bear to cut up or really want to show off. Most of the outer corners are an easy "exploding" block technique, that if you have tried before you will totally fall in love with!
I had a few pattern testers as well, after the tutorial keep reading to see their beautiful quilts! ;)
On to the tutorial...
I’ll be constructing this block using organic Cloud9 Cirrus Solids in Sky, Amazon, Lilac, Iris, and Shadow. I will refer to the blocks by color name, shown in the photo below. Basic sewing / quilting supplies required. |
| Top to Bottom: cloud9 Cirrus Solids in Lilac, Amazon, Shadow, Iris, Sky |
Fabric Requirements: *for one block
- 6” square center block in “Iris”
- 6” square overlay block in “Amazon”
- 7.75” square overlay block in “Sky”
- 4 - 2” square blocks in “Lilac”
- 2 - 1.75” x 10” strips in “Shadow”
- 2 - 1.75” x 12.5” stripes in “Shadow”Finished block: 12 1/2" squareand you can also purchase the quilt pattern from My Shop or Craftsy for this block with detailed instructions, fabric requirement lists, and cutting requirements to make a 54" x 54" quilt.
 Feel free to use this blank coloring block for designing your blocks! Click to download.

Block Construction:
- Lay your 6x6” Iris block down and put (1) 2” square Lilac block in each corner. Sew a diagonal line across all (4) Lilac blocks as shown below.
Trim off excess fabric while leaving a ¼” seam on each corner. Press seams open.

- Take your 6x6” Amazon block and mark lines diagonally from each corner. Using a ruler and a rotary cutter, cut on the marked lines approx 3-4 inches from the center, allowing the triangle pieces to open up (but not all the way!)
Place ontop of your previously made block (using Lilac and Iris) and pin in place.

- Sew a ¼” seam around entire block.
Using small, very sharp scissors, finish cutting the lines we previously drew. Cut all the way to the seam you have sewn but DO NOT cut through the seam.
Open the flaps, flip the block over and press seams toward one side so they lie flat. Do not press them open.

- Take your 7 3/4” square Sky block and mark lines diagonally from each corner. Using a ruler and a rotary cutter, cut on the marked lines approx 3-4 inches from the center, allowing the triangle pieces to open up (but not all the way! - just like we did in last step.)
Place ontop of your previously made block and pin in place.

- Sew a ¼” seam around entire block. (This will look familiar, it repeats steps 2 & 3. Refer back to those photos if you need more help)
Using small, very sharp scissors, finish cutting the lines we previously drew. Cut all the way to the seam you have sewn but DO NOT cut through the seam.
Open the flaps, flip the block over and press seams toward one side so they lie flat.
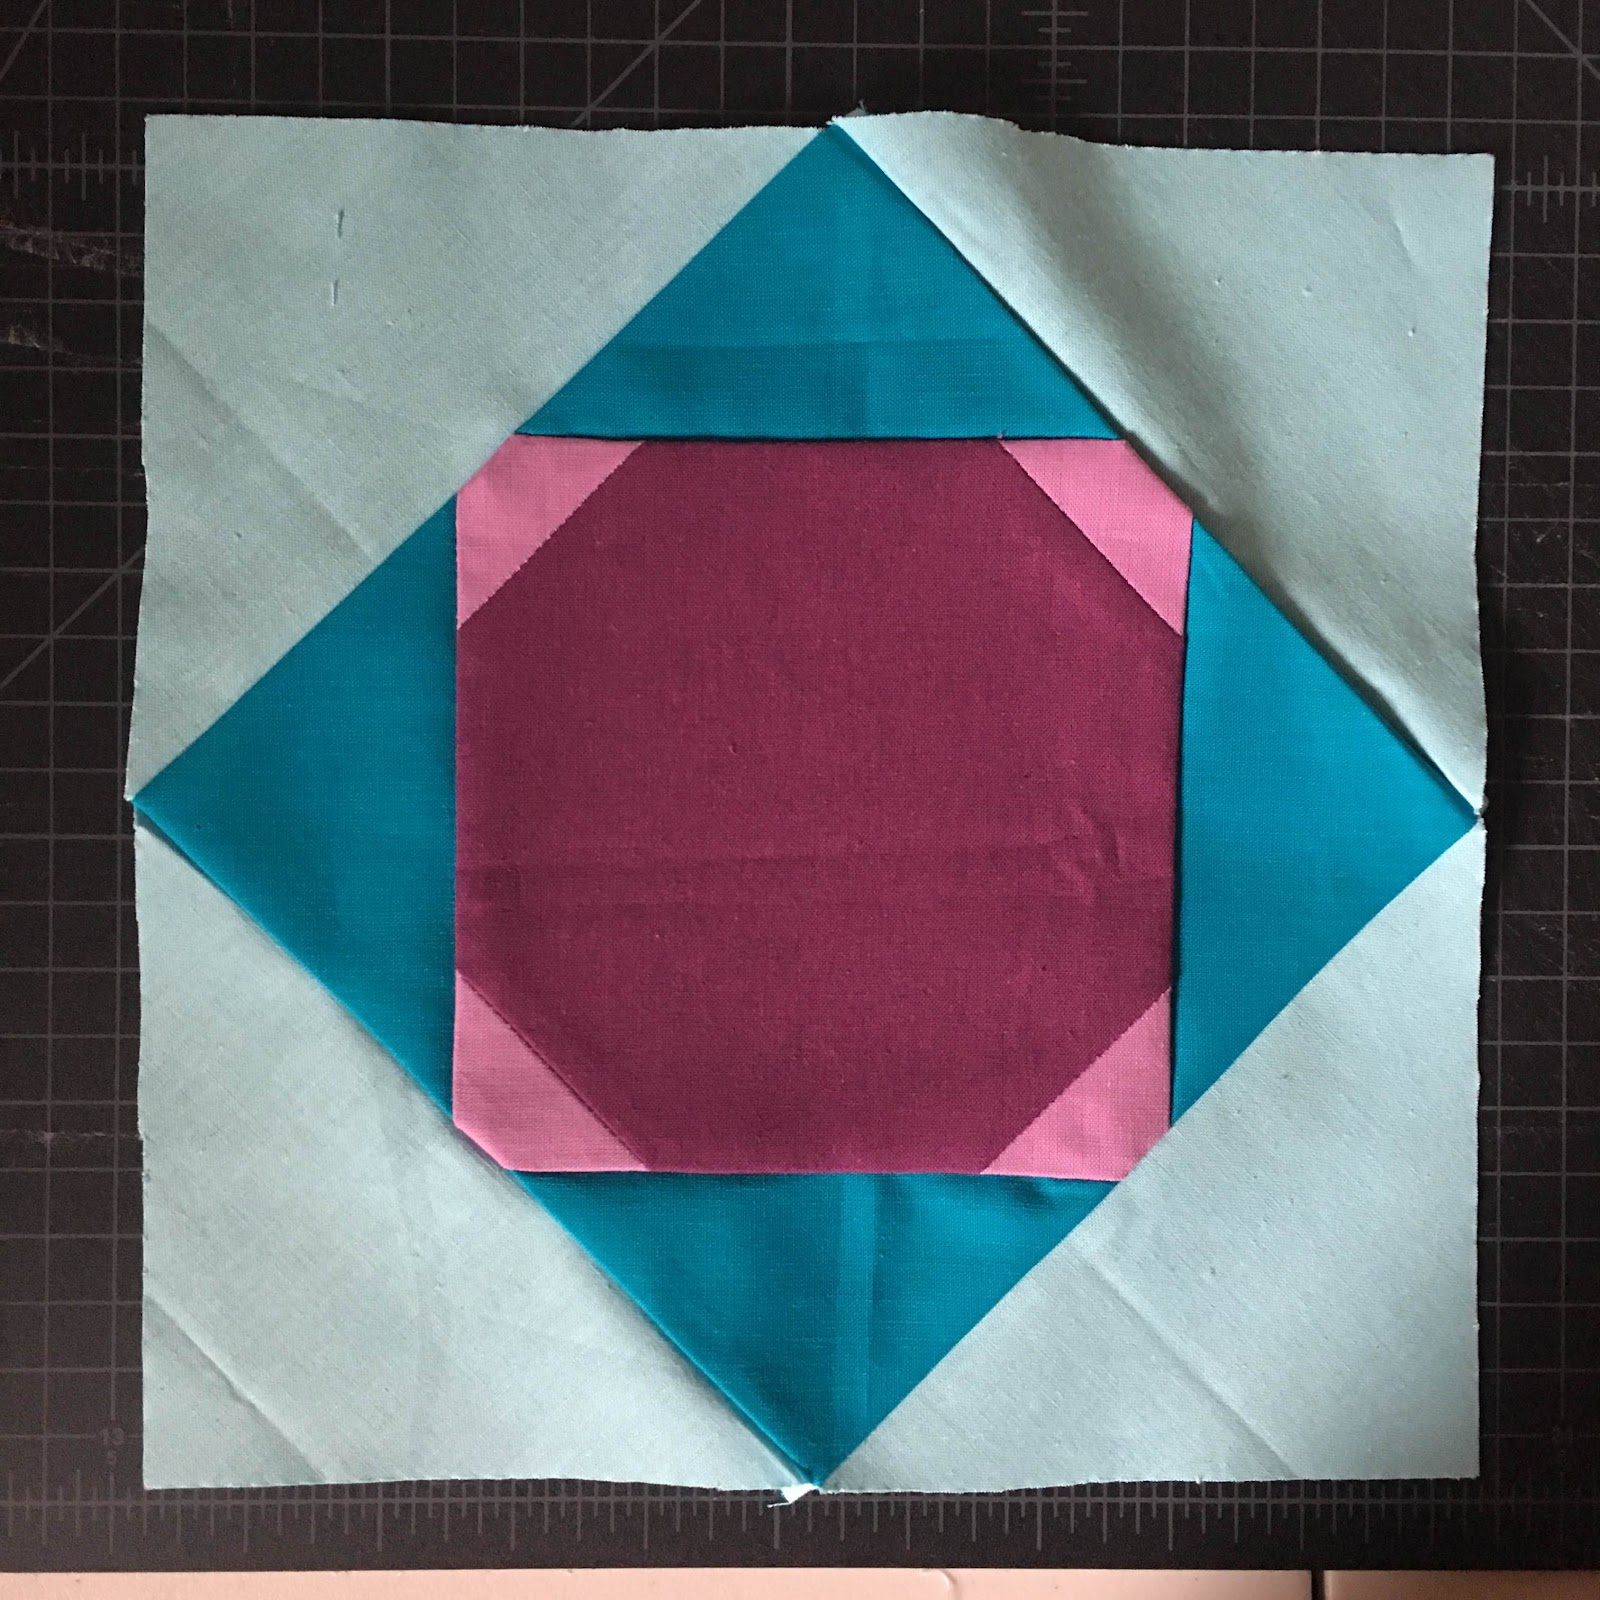
Then, use your two 12 ½” x 1 ¾” Shadow strips and sew one to the left side and one to the right side of your block with a ¼” seam. Press open and you’re finished!

Interested in instructions for a quilt top?
I've written a detailed quilt pattern for this block as well. It includes tips and tricks, fabric requirements and cutting instructions for a 54" x 54" quilt top (with borders included). I take all of the guess work out of it for you!
Although the block itself is free, the quilt pattern comes at a small fee for those who don't wish to do all the math and planning themselves! Plus, it also has step-by-step photos :)
You can purchase it from My Shop or Craftsy.
You can purchase it from My Shop or Craftsy.
Checkout the quilts my testers made...
Aren't these beautiful? I had some amazing pattern testers. They made gorgeous quilts in a short amount of time and provided me with great photos. Thank you so much Sarai, Whitney, and Alicia! You ladies were a lifesaver :)
 | ||
| Photo Credit: Sarai Schuk- @sarai_hobbies |

 | |
|
 |
| Photo Credit: Whitney - @whitsknitsnstitches |
 |
| Photo Credit: Whitney - @whitsknitsnstitches |
That's all for now!
Thanks for joining us! I hope you like my block, and remember if you use my tutorial please use #mazarinquiltblock or #mazarinquilt if you make an entire quilt from it. I would LOVE to see your creations!Remember, you can download and save the free block instructions.
or purchase the full quilt instructions from My Shop or Craftsy.
Please checkout the rest of the blog hop participates listed below..
Monday, September 12th
Abigail @Cut & Alter
Janice @Color, Creating, and Quilting!
Lorinda @Laurel, Poppy, and Pine
Melva @Melva Loves Scraps
Renee @Quilts of a Feather
Kathryn @Upitis Quilts
Kim @Leland Ave Studios
Amanda @this mom quilts
Holly @Lighthouse Lane Designs
Irene @Patchwork and Pastry
Jennifer @Dizzy Quilter
Karen @Tu-Na Quilts, Travels, and Eats
Anne @Said With Love
Suzy @Adventurous Applique and Quilting
Sharla @Thistle Thicket Studio
Kathleen @Smiles From Kate
Amanda @Gypsy Moon Quilt Co.
Sarah @Sarah Goer Quilts
Chelsea @Patch the Giraffe
Jinger @Trials of a Newbie Quilter
Anja @Anja Quilts
Daisy @Ants to Sugar
Tuesday, September 13th
Miranda @I Have Purple Hair
Jennifer @The Inquiring Quilter
Sarah @123 Quilt
Leanne @Devoted Quilter
Jen @Patterns By Jen
Jennifer @RV Quilting
Amanda @Quiltologie
Sharon @Yellow Cat Quilt Designs
Jen @A Dream and A Stitch
Jen @Faith and Fabric
Carole @Carole Lyles Shaw
Stephanie @Quilt’n Party
Susan @Sevenoaks Street Quilts
Katrin @Now What Puppilalla
Amista @Hilltop Custom Designs
Nicole @Handwrought Quilts
Marla @Penny Lane Quilts
Silvia @A Stranger View
Sarah @Smiles Too Loudly
Carrie @the zen quilter
Mary @Quilting is in My Blood
Velda @GRANNYcanQUILT
Wednesday, September 14th
Host: Stephanie @Late Night Quilter
Kathy @Kathys Kwilts and More
Paige @Quilted Blooms
Mary @Strip Quilts Pass it On
Allison @Woodberry Way
Seven @The Concerned Craft
Olusola @Alice Samuel’s Quilt Co.
Ann @Brown Paws Quilting
Jodie @Persimmon + Pear
Vicki @Orchid Owl Quilts
Kitty @Night Quilter
Francine @Mocha Wild Child
Shelley @The Carpenter’s Daughter who Quilts
Jayne @Twiggy and Opal
Geraldine @Living Water Quilter
Shannon @Shannon Fraser Designs
Lisa @Sunlight In Winter Quilts
Jessica @Quilty Habit
Cassandra @The (not so) Dramatic Life
Deanna @Stitches Quilting
Denise @Craft Traditions


Great design, Amista! Like what your test quilters made also!
ReplyDeleteThanks Paige! I love the quilts they made :)
DeleteVery cool and very unique piecing. Great stuff
ReplyDeleteThats what I was going for! Thank you :)
DeleteHi Amista, congratulations to the wonderful block. I am looking forward to seeing it making it's way out in the world =)
ReplyDeleteThanks so much!! :)
DeleteWell done, it's beautiful and your testers did great 👏
ReplyDeleteI agree, their quilts are so beautiful. Thank you!
DeleteVery nice-very different! Thank you
ReplyDeleteThank you!
DeleteBeautiful block Amista and a very well written tutorial.
ReplyDeleteThanks so much Jennifer!
DeleteI love how your pattern testers and test quilts came together; the design is great for featuring a special print in the center. Thank you so much for joining the hop!
ReplyDeleteThank you Yvonne! This whole New Quilt Bloggers experience and the opportunity to do this blog hop has been amazing! Thanks so much for helping organize it!
DeleteIt's lovely Amista, and a great way of making the block and keeping the scraps down. Great tutorial.
ReplyDeleteSmiles
Kate
Thanks so much Kate!
DeleteYou're right, this block is perfect for fussy cutting! Great block and tutorial, Amista!
ReplyDeleteIsn't it? I love fussy cutting and I feel like this is a great way to show everything off. Thank you!
DeleteYou're right! This is a great block to showcase some fussy cutting or for some amazing quilting! Nice job on your tutorial.
ReplyDeleteThanks so much :)
DeleteAwesome block and tutorial!
ReplyDeleteThanks Ann!
DeleteGreat block! I've never seen that method of adding triangles to the corners before...I'll have to give that a try! It looks so quick and simple.
ReplyDeleteI believe its referred to as "exploding block" or something similar to that. I learned it several months ago. It seems a bit odd but is actually very easy and precise.
DeleteWell done.It`s sp beautiful!
ReplyDeleteGreat job! The block and tutorial are so well done and I loved seeing all of the different versions.
ReplyDeleteThanks Cheryl! This has been such an awesome opportunity.
DeleteThis is a very striking block. I'm so impressed with all the talent on this hop.
ReplyDeleteThank you! I have been as well, the blocks are really amazing.
DeleteHow luck you bloggers are to be able to experiment with fabrics and come out with something fabulous.
ReplyDeleteI agree :) It is fun for sure!
DeleteYour block is fabulous.
ReplyDeleteThanks Mary :)
DeleteGreat job and great technique demonstration!
ReplyDeleteThank you so much! I tried to make it easy
DeleteThis is a great block.
ReplyDeleteThanks Anja!
DeleteWhat a super sweet block, Amista! Love seeing all the different quilts too!
ReplyDeleteThank you! The quilts were amazing :)
DeleteWhat a great block Amista - and a wonderful tutorial and .pdf. Your testers did an amazing job - so great to see the block made up into quilts of different colours.
ReplyDeleteThank you! :)
DeleteNifty trick! And I love how the block comes together in a quilt top - really pretty!
ReplyDeleteI think so too, thanks Shannon :)
DeleteLovely block and such an interesting technique!
ReplyDeleteThanks Sue, I appreciate it!
DeleteI LOVE this block!
ReplyDeleteThe quilts everyone made are beautiful!
Aww thanks Amy, I'm glad you like it!
DeleteGreat looking block. Such a fun and interesting hop.
ReplyDeleteThanks Heide!
DeleteI love blocks that can showcase great prints and are perfect for fussy cutting. Thanks so much for the PDFs too. And I also like how you showed sewn quilts using your blocks with a variety of fabric. Fantastic job! Take care, Mary.
ReplyDeleteSo do I, and you're very welcome! :) My testers definitely did a great job. So grateful for them. Thanks Mary!
DeleteI also like blocks in which I can showcase a special fabric. And no waste! Great job!
ReplyDeleteYes!! Love no-waste blocks :) Thanks Jenn
DeleteI love your block. Your tutorial is great. Thank you for sharing!
ReplyDeleteThanks so much Jen!
DeleteI agree! This is a good block design for fussy cutting. The quilts from your testers are awesome.
ReplyDeleteThank you Dena!
DeleteGreat fussy cutting block design. I liked that you included a coloring page. My mom likes to do those as she creates her quilts. Me..I just jump right in and usually regret some fabric decisions. Thanks for the PDF of the pattern. Karen
ReplyDeleteYes, coloring pages are a must in my opinion, especially if all your blocks will be different. You're welcome Karen, and thanks for stopping by! :)
Delete